
The Problem:
So I tend to get up very early in the morning, maybe 4-5am most days. ‘Sleeping In’ for me is ~6am or later, and that rarely happens. Lately, instead of adding more blog content, I’ve been working on a new site to attach to ShavingTheYak. Its an automated blog feed/aggregator, and its getting close to done, but I’m still running the code to generate the site locally. I currently need to accomplish a few tasks:
- Setup a pipeline in the private repo I am using (on Github). I don’t want to ‘pay’ for actions runs here so I will attempt to self host. I also don’t want to add any cloud resources for this.
- Get that pipeline to deploy to a staging lambda that will run and generate the staging version of the site. I can still make changes and run things locally, but I also need a reproduction of my planned prod setup here. Using Github Actions will allow me to have a setup for stage that I can replicate to prod.
Lets focus on the first piece here, which is getting the ability to run self-hosted Github Actions from our home ‘windoze’ rig.
The Plan For Adding Pipeline Tooling:
Now I’ve used the Github actions runner inside of docker in the past, but I’m so used to Kubernetes for this type of thing it seems silly to use docker. So my choice here will be to:
- Install a ‘stable’ virtual machine with Ubuntu server on my personal windows ‘rig’ that has plenty of resources free.
- Install some flavor of kubernetes inside this VM
- Install kubectl/helm/etc
- Install the runners (see https://github.com/actions/actions-runner-controller)
- Configure and test the runners with my private repo, so I can use Github Actions
Getting It Done:
- Download and Install VirtualBox. I don’t like the way WSL works in windows, and my recent attempt to use it ended in tragic disaster, where a windows update destroyed the linux VM somehow.
- Installing the latest Ubuntu server proved to be easy – after downloading the ISO.
- When you are installing the VM, Ubuntu conveniently give you choice of pre-made stuff to install. Choose ‘OpenSSH’ and ‘MicroK8s’ here.
- Once the server is running, change the network settings to allow you to ssh to the box directly. If you have chosen the NAT networking adapter which is the default, the box won’t have any exposed ports unless you add them (for ssh connection like THIS). Once this works you can start the VM in headless mode and just use your favorite SSH client to access it.
- Microk8s seems to work out of the box here, which is great, given how complex k8s is in general.
- Once you are onto your server run:
- sudo usermod -a -G microk8s $USER
- sudo chown -f -R $USER ~/.kube
- Add aliases to .bashrc or elsewhere:
- alias kubectl=’microk8s kubectl’
- alias helm=’microk8s helm’
- Check the status of microk8s: microk8s status –wait-ready
- Log out and back in so your user and alias changes work
- Once you are onto your server run:
- Ensure that the helm feature is installed as well:
microk8s enable helmif you need to, and the helm command is again a bundled one that comes with microk8s, so you need those aliases setup to use the built in helm (or kubectl) as ‘normal’.
Once you get to the point where kubectl and helm both seem to run, we can move on to installing the runner for Github!
Install cert-manager. Luckily this is a plugin already bundled with microk8s. microk8s enable cert-manager – and microk8s will install it for you! You can check the pods afterwards:
sammy@runbox:~$ kubectl get po -A
NAMESPACE      NAME                                      READY   STATUS    RESTARTS      AGE
kube-system    coredns-864597b5fd-4l6vn                  1/1     Running   1 (48m ago)   54m
kube-system    calico-kube-controllers-77bd7c5b-wjsmw    1/1     Running   1 (48m ago)   54m
kube-system    calico-node-8f7wt                         1/1     Running   1 (48m ago)   54m
cert-manager   cert-manager-cainjector-99677759d-4nv2b   1/1     Running   0             57s
cert-manager   cert-manager-7cf97bbd47-dsh7s             1/1     Running   0             57s
cert-manager   cert-manager-webhook-8486cb8479-dwdms     1/1     Running   0             57s
Next we need to create a new personal access token for the runner installation. Remember to not allow the token access to any orgs/etc you may also be a member of if this is a personal project! Save the token in your password manager for now. For this example I only gave the PAT full repo access to my personal repos.
Helm deployment: Now I already aliased helm to ‘microk8s helm’ so I can just use helm normally. Lets add the repo for the actions controller:
helm repo add actions-runner-controller https://actions-runner-controller.github.io/actions-runner-controller
helm repo update
If the repo updates, we are good. Lets now get the controller going:
helm upgrade --install --namespace actions-runner-system --create-namespace\
  --set=authSecret.create=true\
  --set=authSecret.github_token="REPLACE_YOUR_TOKEN_HERE"\
  --wait actions-runner-controller actions-runner-controller/actions-runner-controller
...<snip output>...
sammy@runbox:~$ kubectl get po -n actions-runner-system
NAME                                         READY   STATUS    RESTARTS   AGE
actions-runner-controller-5c996cd9c7-m8njg   2/2     Running   0          66s
So far, so good? now we need to create an actual runnerdeployment using a yaml file. It’s probably a good idea to spec it to only run for a single repository for now:
apiVersion: actions.summerwind.dev/v1alpha1
kind: RunnerDeployment
metadata:
  name: personal-github-runners
  namespace: actions-runner-system
spec:
  replicas: 1
  template:
    spec:
      repository: yourgithubname/yourgithubrepo
So the format for the repository spec here is the last bit of the url to your personal repo, basically <username>/<reponame>. You may want to create a ~/yaml folder inside your VM to start storing stuff like this yaml file for re-deployment or tweaking later. Assuming your file is called ‘runnerdep.yaml’ you can apply it with kubectl apply -f runnerdep.yaml. The controller will see this and then create your runner pod. Eventually you should be able to see the runner pod up and running in your namespace.
sammy@runbox:~/ACR$ kubectl get po -n actions-runner-system
NAME                                         READY   STATUS    RESTARTS   AGE
actions-runner-controller-5c996cd9c7-m8njg   2/2     Running   0          11m
personal-github-runners-5bl9k-dl68k          2/2     Running   0          2m30s
And checking the logs for the pod personal-github-runners-5bl9k-dl68k should give us a ‘connected to github’ message eventually. This installation also defaults to giving you a second container for docker, which is super convenient. This means that you can also run docker commands to build/push etc from inside your github actions, without installing anything else. Go to your specific repository settings and verify that the runner exists in the actions>runners section:
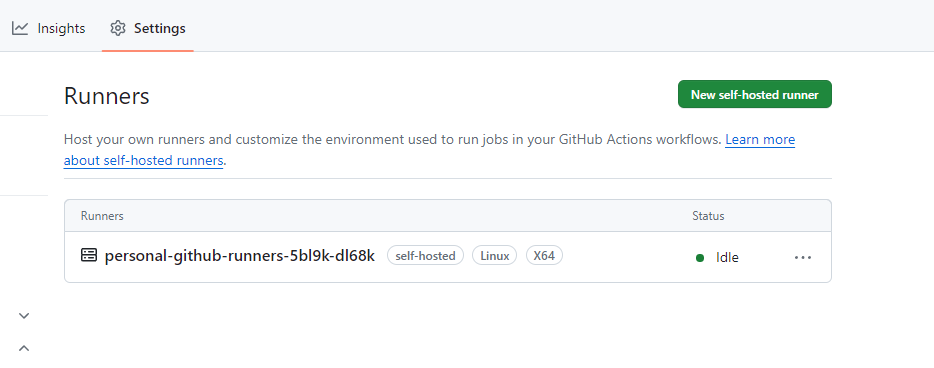
Awesome! We now have a runner attached to the repo we can use to run basically anything we want. Lets test it out using this.
- Create a .github/workflows folder in your repo.
- Add the following file as demo_action.yaml (or whatever you want to name it):
name: GitHub Actions Demo
run-name: ${{ github.actor }} is testing out GitHub Actions 🚀
on: [workflow_dispatch]
jobs:
  Explore-GitHub-Actions:
    runs-on: self-hosted
    steps:
      - run: echo "🎉 The job was automatically triggered by a ${{ github.event_name }} event."
      - run: echo "🐧 This job is now running on a ${{ runner.os }} server hosted by GitHub!"
      - run: echo "🔎 The name of your branch is ${{ github.ref }} and your repository is ${{ github.repository }}."
      - name: Check out repository code
        uses: actions/checkout@v4
      - run: echo "💡 The ${{ github.repository }} repository has been cloned to the runner."
      - run: echo "🖥️ The workflow is now ready to test your code on the runner."
      - name: List files in the repository
        run: |
          ls ${{ github.workspace }}
      - run: echo "🍏 This job's status is ${{ job.status }}."
Note that we are using ‘workflow_dispatch’ here for the trigger and ‘self-hosted’ for the ‘runs-on’ field. This means that we will be able to manually trigger the action in our repo, and that it will run on our self-hosted runners. You can also add additional tags to the runner deployment later if you want to have multiple types of runners for some reason. (location or base image change/etc)
Once you add the actions file, you should be able to switch to the ‘actions’ tab on your repo and you should see ‘Github Actions Demo’ on the left. You can now select that, and on the right side there should be a ‘run workflow’ pull down. Go ahead and use this to run the workflow on the main/master branch.
Once the action runs you should see a progress spinner, and you can click on it to see the logs for the action run. Assuming everything finishes OK the action run should show green.
One thing to note also about the Actions Runner Controller runner that we have installed, is that it is ephemeral – i.e. it only lasts for one ‘job’ and then is replaced. This is good for security but may slow you down as we currently only have one pod setup for the runners. Feel free to mess around with the runnerdeployment yaml from earlier. You cad add more replicas, specify resource usage requests and limits, and even add yaml for a custom autoscaler that will scale pods up and down as needed. You should be able to find all this extra stuff in the docs for the ACR project. Keep in mind that the runners will request a certain amount of ram and cpu up front from your microk8s cluster here, and they just wait around to run a ‘job:’ as defined in your actions files, so they do require resources to stay ready. This is a bit of a downside to the Github Runner in general, but I haven’t yet taken the time to see if anyone has some sort of a queue/pod creation system in place for this sort of thing yet that would allow you to not use any resources up unless actually needed for a running job. Maybe I will tackle that another day.